Discovering how to use a cast iron smoker box can revolutionize your outdoor cooking experience.
As an avid camper and outdoor enthusiast.
In this article, I aim to demystify the process and share step-by-step instructions for mastering the art of using this amazing tool.
Imagine being able to savor the authentic smoky flavor of campfire meals, right in your backyard!
Get ready, this knowledge could add a whole new layer of enjoyment to your BBQs and camping cookouts.
Together, we'll unravel the secrets that can bring your outdoor culinary adventures to a new level of taste and satisfaction.
Understanding Cast Iron Smoker Boxes
Before we delve into the nitty-gritty of using a smoker box, let's get our feet wet with some basics. We'll look at what a cast iron smoker box is and why it's a must-have tool in your barbecue toolkit. Remember, knowing your tools is the first step to mastering them!
What is a Cast Iron Smoker Box?
Ever wondered how restaurants and BBQ joints consistently serve up that perfectly smoked, mouthwatering meat? Let me tell you, the secret is not in the sauce, it's in the smoke! That's where a cast iron smoker box comes into play.

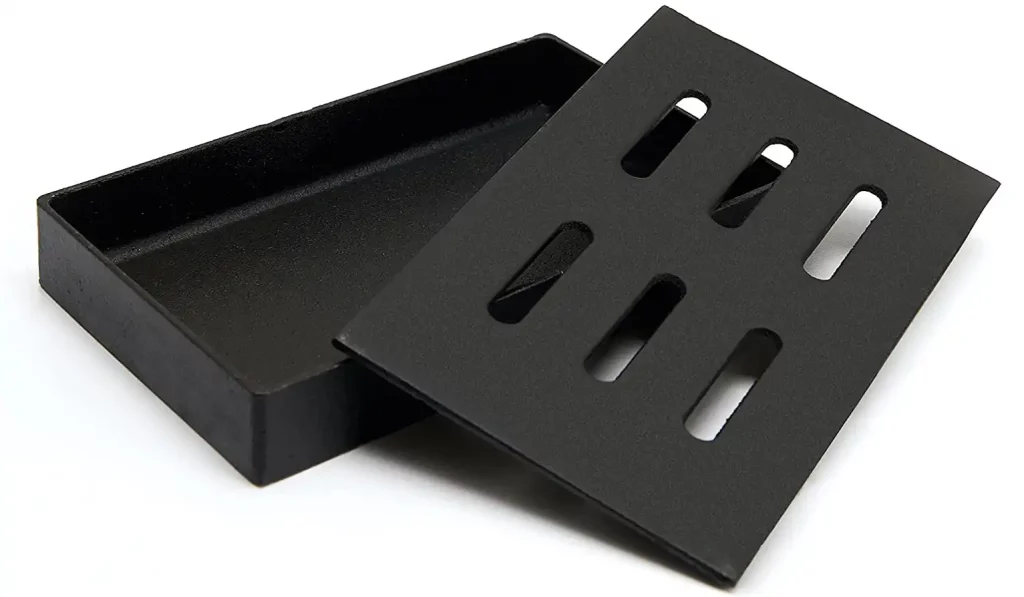
A cast iron smoker box is a simple, yet ingenious tool that you use on your grill. It's a heavy-duty box made of cast iron, designed to withstand high temperatures and distribute heat evenly. But here's the kicker – it's used to hold wood chips that will smolder and produce that wonderful smoke, which in turn infuses your food with an unbeatable smoky flavor.
Why Use a Cast Iron Smoker Box?
You might ask, “Why not just toss the wood chips directly onto the coals?” Well, you could, but it's like running a marathon without training. You might reach the finish line, but it won't be pretty. Directly exposed wood chips tend to burn up too quickly, releasing all their smoky goodness in a short burst rather than a sustained, even smoke.
With a cast iron smoker box, you maintain control. It's all about subtlety and balance. The box shelters the wood chips, allowing them to smolder at a slower, more controlled pace. The result? Your meat gets ample time to absorb the smoke, leading to a deeper, richer flavor. Plus, it's reusable, meaning less waste and more value for your money.
Moreover, cast iron smoker boxes outperform their stainless steel counterparts. They retain heat better, leading to a more consistent smoking process, and they're incredibly durable. It's the kind of rugged, reliable tool that fits right into our outdoor lifestyle.
So, to wrap things up here – a cast iron smoker box helps you recreate the authentic, smoky flavor we all crave in our barbecued food. And the best part? It's simpler to use than you might think.
Learn more: How to Make a Gas Grill Taste Like Charcoal
Necessary Supplies for Using a Cast Iron Smoker Box
So, you're all set to transform your BBQ game with a cast iron smoker box. But before we jump right into the thick smoke, let's first gather all the essentials. Here's what you'll need:
- A Cast Iron Smoker Box: The heart of our operation, this box will hold and heat the wood chips, releasing that smoky flavor we're after.
- Wood Chips: You've got a plethora of options here. Hickory, applewood, mesquite—the choice is yours, and it will dictate the flavor profile of your smoke. Mix and match to create your unique BBQ signature!
- Grill: A gas or charcoal grill will do just fine. Remember, the grill's job is to heat up the smoker box, not necessarily to cook the food.
- Your favorite food to grill: The canvas upon which our smoky masterpiece will be painted. It could be a juicy slab of ribs, succulent chicken, or even some fresh veggies for my vegetarian friends out there.
- Tongs or Oven Mitts: You're going to deal with hot stuff, and safety always comes first. Get a good pair of tongs or heat-resistant mitts to handle the smoker box.
Each of these items plays a crucial role in the process. From the smoker box that holds and heats the wood chips to the tongs that ensure your safety, each supply contributes to your grilling success.
Step-by-Step Guide to Using a Cast Iron Smoker Box
Now that we've armed ourselves with the necessary supplies, it's time to turn theory into practice. Let's get grilling, shall we?
Step 1: Preparing Your Smoker Box
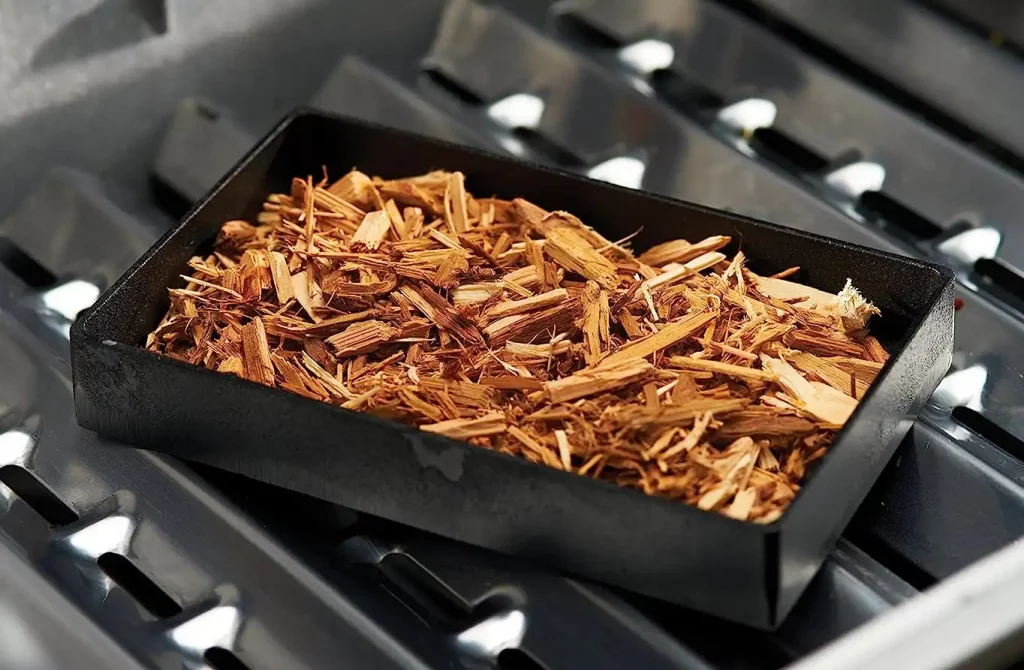
Start by filling your smoker box with your chosen wood chips. You don't need to soak the chips beforehand—a common misconception. Keep it dry and let the grill do its magic. Fill the box up to about two-thirds to leave some room for the smoke to flow.
Step 2: Preheating the Grill
Next, preheat your grill. If you're using a gas grill, aim for a medium setting. For those of you on a charcoal grill, let the coals burn until they're covered with a layer of white ash. Preheating ensures your wood chips start smoking as soon as you place the box on the grill.
Step 3: Placing the Smoker Box on the Grill
Place the filled smoker box on the grill grates. If you're using a gas grill, put it on top of the burners. For charcoal grills, place the box directly on the charcoal. Close the lid to trap the heat and start the smoking process.
Step 4: Cooking with the Smoker Box
Once you see the smoke coming out from your grill (a beautiful sight, indeed!), it's time to introduce your food to the grill. Place your food on the grill grates, ideally as far from the heat source as possible for indirect grilling. Keep the lid closed as much as possible to keep the smoky goodness in.
Step 5: After-Use Care for the Smoker Box
After your culinary masterpiece is ready and you've taken the food off the grill, don't forget about the smoker box. Let it cool completely before handling. Empty the ashes, give it a good scrub if needed, and store it in a dry place, ready for your next BBQ adventure.
And there you have it, a simple guide to using a cast iron smoker box. With this little tool and a bit of practice, you'll be the talk of the neighborhood BBQ in no time.
Learn more: How to Use a Smoker Box on a Charcoal Grill
Tips and Safety Precautions when Using a Cast Iron Smoker Box
Mastering the art of the smoker box is not just about knowing the steps. Here are a few extra tips and safety measures to make sure your BBQ experience is both delicious and safe.
- Patience is a Virtue: Wait until you see smoke coming out of the grill before adding your food. Remember, the smoke is what imparts that unique flavor to your food.
- Too Much of a Good Thing: Too much smoke can make your food taste bitter. The key is a steady, moderate smoke. If the smoke is rolling out thick and heavy, reduce the heat a bit.
- Stay Safe: Always use tongs or oven mitts when handling the hot smoker box. Never try to refill or move the box while it's still hot.
- Keep it Clean: Clean your smoker box after each use. This will prolong its life and prevent old, burnt chips from affecting the flavor of your next BBQ.
- Experiment with Flavors: Don't be afraid to try different types of wood chips. Each type imparts a unique flavor, so mix and match to discover your favorite combination.
To know more: How to Get More Smoke Flavor From Pellet Grill
FAQs about Use Cast Iron Smoker Box
What is the best way to use a smoker box?
Can you use a cast iron smoker box in a gas grill?
How do you use a smoker box on a gas grill?
Why won't my smoker box smoke?
Conclusion
And that's a wrap! Using a cast iron smoker box may seem a bit intimidating at first, but I promise you, it's as simple as we've outlined. The key ingredients are patience, attention to safety, and a love for that irresistible smoky flavor.
Embrace the joy of infusing your food with the robust, hearty flavors that only smoking can offer. Whether it's a tender piece of meat, fresh seafood, or even veggies, a cast iron smoker box can transform your everyday barbecue into a gourmet experience.
In the words of the immortal Julia Child, “You don't have to cook fancy or complicated masterpieces – just good food from fresh ingredients.” So, grab your smoker box and your grill, and let the aroma of smoked food fill your backyard. The world of BBQ is waiting for you!
Stay tuned for more adventures in the great outdoors, and as always, happy grilling!
Learn more: How to Use Cast Iron Teapot with Infuser


